March 20, 2021 - Patrick Kerwood
Bare Metal Kubernetes install with Kubespray and Cilium
In this post I will setup a bare metal Kubernetes cluster using Kubespray. At the same time I'll get rid of that pesky Kube Proxy and replace it with the eBPF based Cilium CNI. Since Docker is deprecated in Kubernetes v1.20 we will be installling Containerd or CRI-O instead. This setup is tested on CentOS 8 Stream and Redhat Enterprise Linux 8.4.
The steps are as follows.
Besides installing Cilium as the Kubernetes CNI, we will also install a little bonus project called Hubble (opens new window). It's a networking and security observability UI that is tight integrated with Cilium.
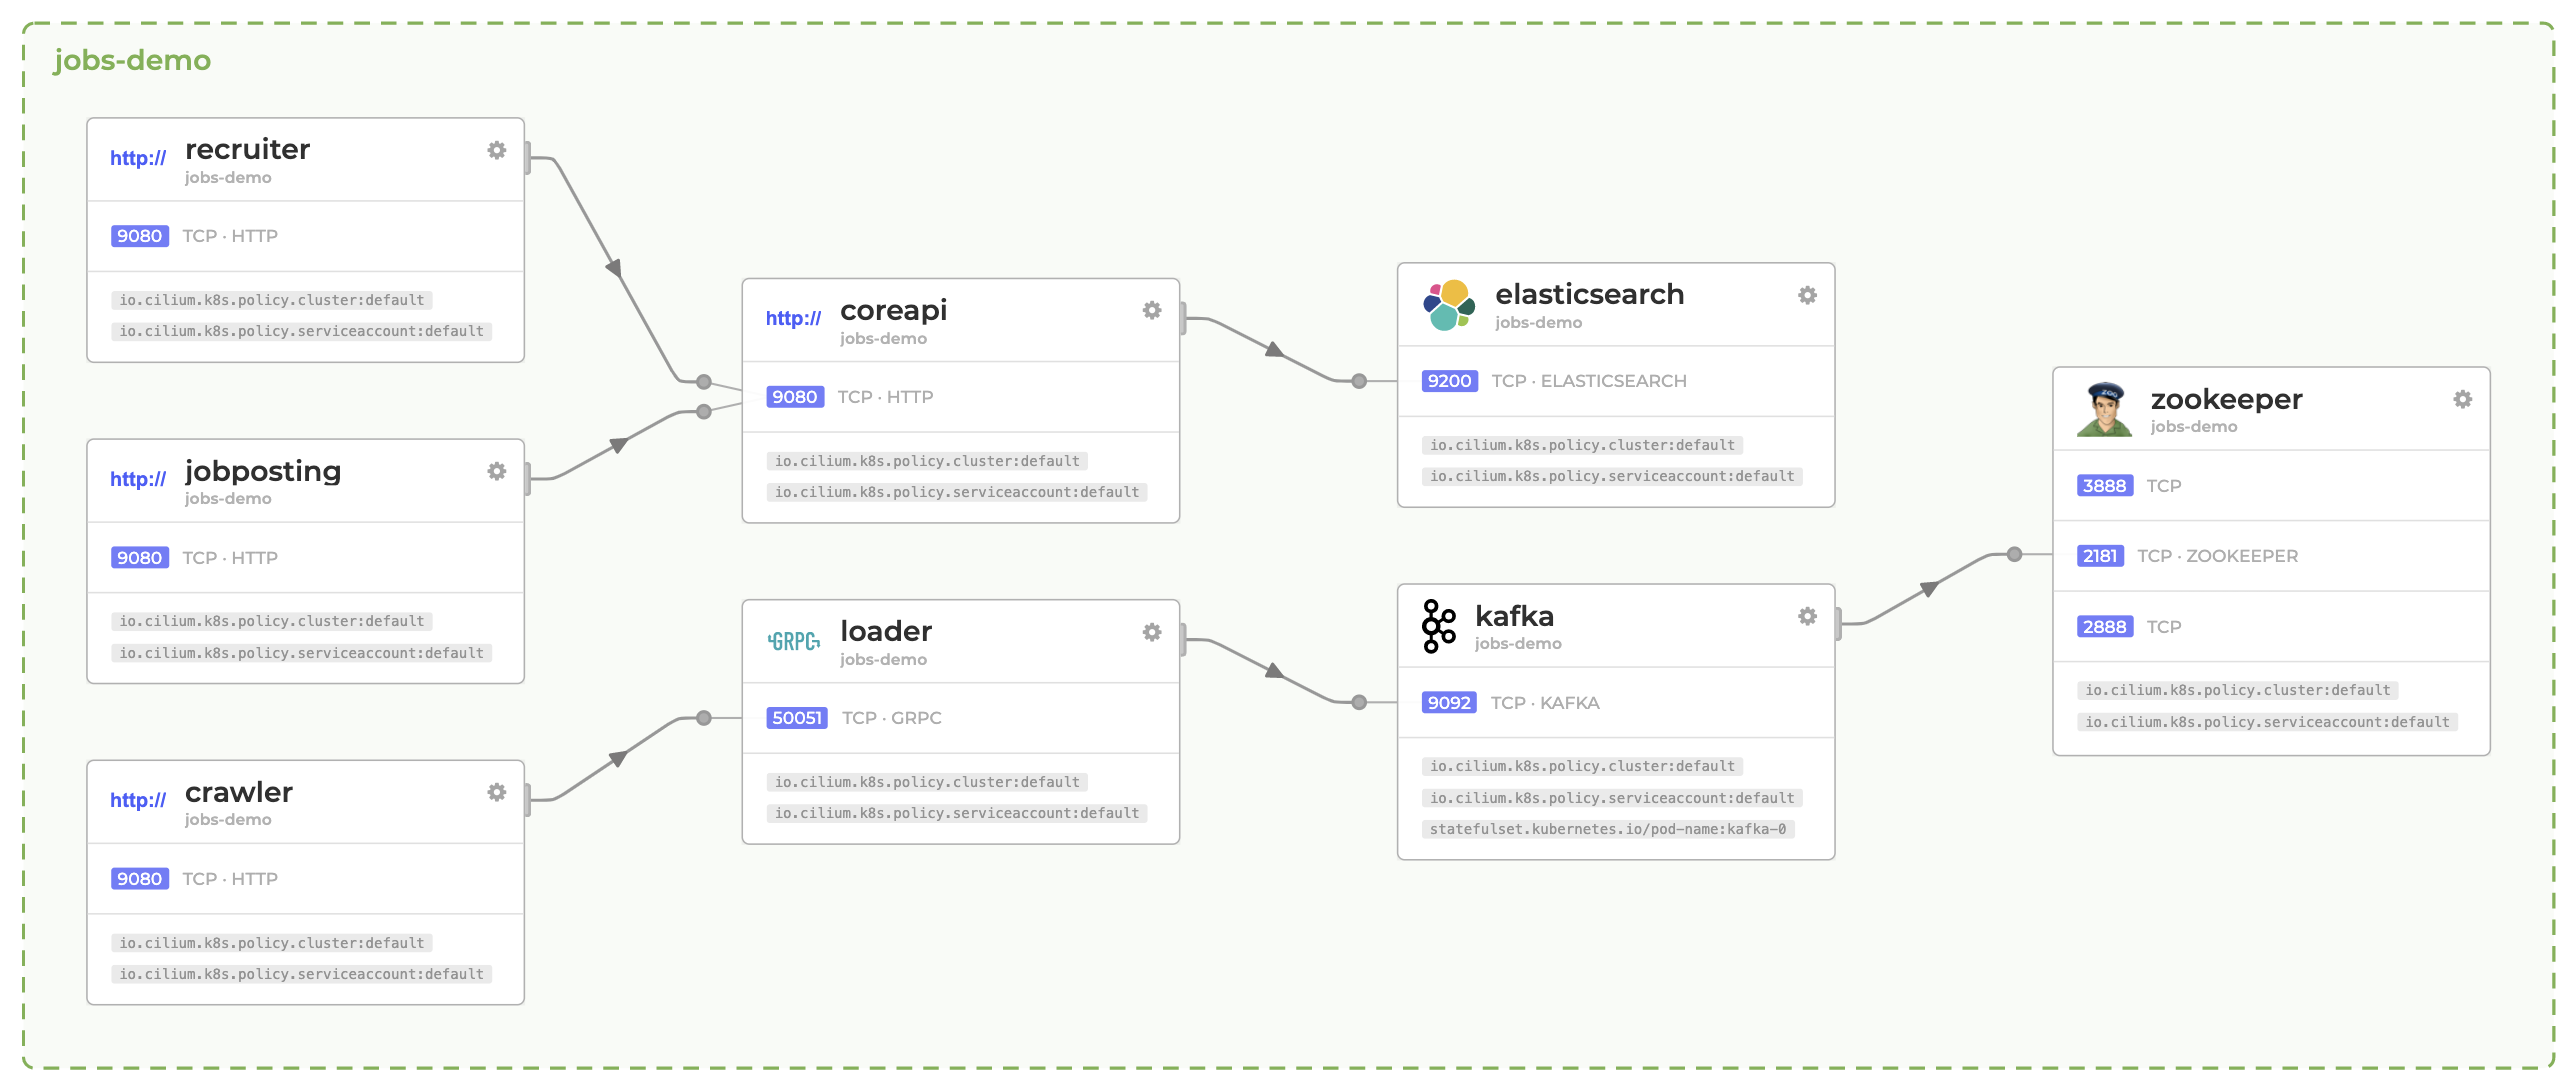
Hubble gives you a nice map of your services and how they are connected. It can also show you the packages flying around in your cluster and which are dropped because of network policies and why.
# Building an Ansible container for Kubespray
Ansible requires a lot of Python and as I have mentioned before, I don't like to soil my laptop in Python. So building on my earlier post, Ansible Container (opens new window), lets create a container image that contains all of Kubespray's requirements.
First go grap the requirements.txt file from the Kubespray repo. (opens new window)
Create the Dockerfile like in the post but add the COPY command above the RUN command and change the pip install ansible line with pip install -r requirements.txt as shown in the example below.
COPY requirements.txt requirements.txt
RUN set -x && \
...
    echo "==> Installing ansible..."  && \
    pip install -r requirements.txt && \
...
Build the image and add the alias' like in the post.
Or, you could install Ansible and the Kubespray dependencies locally: https://github.com/kubernetes-sigs/kubespray#ansible (opens new window)
# Configuring Kubespray
Clone the kubespray repository. You can go ahead and clone the master branch if you want, personally I like to use a specific version. At the time of writing the newest version of Kubespray is v2.16.0 which is the one I will be using.
Kubespray v2.16.0 will give you the following.
- Kubernetes
v1.20.7 - Etcd
3.4.13 - Containerd
1.4.4 - CRI-O
1.20 - CoreDNS
1.7.0 - Nodelocaldns
1.17.1 - Kubernetes Dashboard
v2.2.0
git clone --branch v2.16.0 https://github.com/kubernetes-sigs/kubespray
cd kubespray
I will be using the inventory/sample folder for the configuration, you can copy the folder and give it different name if you want.
Now lets make a few changes to it.
- Change the
kube_network_plugintocniin thek8s-cluster.ymlfile. - Set
etcd_deployment_typetohostin theetcd.ymlfile. - Add the
kube_proxy_remove: truevariable tok8s-cluster.ymlfile to disable Kube Proxy.
sed -i -r 's/^(kube_network_plugin:).*/\1 cni/g' inventory/sample/group_vars/k8s_cluster/k8s-cluster.yml
sed -i -r 's/^(etcd_deployment_type:).*/\1 host/g' inventory/sample/group_vars/etcd.yml
echo "kube_proxy_remove: true" >> inventory/sample/group_vars/k8s_cluster/k8s-cluster.yml
If you want to use containerd do the following.
- Set the
container_managertocontainerdin thek8s-cluster.ymlfile.
sed -i -r 's/^(container_manager:).*/\1 containerd/g' inventory/sample/group_vars/k8s_cluster/k8s-cluster.yml
If you want to use cri-o do the following.
- Add
download_container: falseandskip_downloads: falsetoall.yml. - Set the
container_managertocrioin thek8s-cluster.ymlfile. - Change the
crio_conmonpath inredhat.yml. This should hopefully not be needed in the future. #7690 (opens new window)
echo "download_container: false" >> inventory/sample/group_vars/all/all.yml
echo "skip_downloads: false" >> inventory/sample/group_vars/all/all.yml
sed -i -r 's/^(container_manager:).*/\1 crio/g' inventory/sample/group_vars/k8s_cluster/k8s-cluster.yml
sed -i -r 's/^(crio_conmon:).*/\1 \/usr\/bin\/conmon/g' roles/container-engine/cri-o/vars/redhat.yml
# Building your inventory
You need to create an inventory file. That is where you define which nodes to use, what their roles are etc. There's an inventory.py script that generates the inventory for you, which you can find some documentation on here. (opens new window)
Or you can just edit the yaml below to fit your needs.
Below you'll see 3 hosts, node1-master, node2-worker and node3-worker. You can call them what ever you want. The ip and access_ip properties are the internal IP on which they can reach each other and the ansible_host are the IP which the Kubespray Ansible scripts can reach the hosts. My nodes are running in the cloud so the ansible_host property will be their public IP.
- The
kube-master.hostsare a list of masters. - The
kube-node.hostsare a list of all nodes. - The
etcd.hostsare a list of etcd nodes.
cat << EOF > ./inventory/sample/hosts.yml
all:
  hosts:
    node1-master:
      ansible_host: 92.104.249.162
      ip: 10.0.0.10
      access_ip: 10.0.0.10
    node2-worker:
      ansible_host: 92.105.95.132
      ip: 10.0.0.11
      access_ip: 10.0.0.11
    node3-worker:
      ansible_host: 92.105.86.187
      ip: 10.0.0.12
      access_ip: 10.0.0.12
  children:
    kube-master:
      hosts:
        node1-master:
    kube-node:
      hosts:
        node1-master:
        node2-worker:
        node3-worker:
    etcd:
      hosts:
        node1-master:
    k8s-cluster:
      children:
        kube-master:
        kube-node:
EOF
# Configure the nodes
Kubespray will use the root account for setting up the nodes. Copy your SSH key to the nodes if not already present.
ssh-copy-id root@92.104.249.162
ssh-copy-id root@92.105.95.132
ssh-copy-id root@92.105.86.187
We need to stop and disable firewalld on all the nodes. Since we have our inventory file ready, we can just use Ansible for that.
ansible all -i inventory/sample/hosts.yml -a "systemctl stop firewalld" -b -v
ansible all -i inventory/sample/hosts.yml -a "systemctl disable firewalld" -b -v
CentOS 8 Stream
For some reason tar was not installed on my CentOS 8 Stream servers from Linode, so it had to be installed manually.
ansible all -i inventory/sample/hosts.yml -a "dnf install tar -y" -b -v
# Install Kubernetes
Run below command to start the installation.
ansible-playbook -i inventory/sample/hosts.yml cluster.yml -b -v
# Installing Cilium with Helm
For the next step, you can either work from a master node (kubectl is installed and ready to go), or you can grab the kubeconfig file from /etc/kubernetes/admin.conf on a master and use it on your local machine, remember to change server: https://127.0.0.1:6443 to you masters public IP or Load Blancer IP.
What ever you do, you'll need to install Helm for the next step.
Add the Cilium repository and update.
helm repo add cilium https://helm.cilium.io/
helm repo update
Run below command to install Cilium and Hubble.
helm install cilium cilium/cilium --version 1.10.0 \
  --namespace kube-system \
  --set kubeProxyReplacement=strict \
  --set k8sServiceHost=127.0.0.1 \
  --set k8sServicePort=6443 \
  --set hubble.listenAddress=":4244" \
  --set hubble.relay.enabled=true \
  --set hubble.ui.enabled=true \
  --set hubble.metrics.enabled="{dns,drop,tcp,flow,port-distribution,icmp,http}"
# Testing Cilium
Cilium has a testing manifest that deploys various resources to test different scenarios. At the time of writing two of the network policies will fail due to the test not being updated with nodelocaldns. If you are interested in how the network policies work, you can try and fix them.
kubectl create ns cilium-test
kubectl apply -n cilium-test -f https://raw.githubusercontent.com/cilium/cilium/v1.10.0/examples/kubernetes/connectivity-check/connectivity-check.yaml
Have a look at the pods and see which ones are failing.
kubectl -n cilium-test get pods
# Portforward Hubble UI
To get access to that sweat Hubble UI you can either deploy an ingress or port forward the service to your localhost.
kubectl port-forward -n kube-system svc/hubble-ui --address 0.0.0.0 8080:80
If you are on the master node, that port forward did not really do you any good. Create an SSH tunnel to the node and map it to your localhost.
ssh -L 8080:localhost:8080 root@92.104.249.162
You can now reach it on http://localhost:8080.
# References
- https://github.com/kubernetes-sigs/kubespray (opens new window)
- https://github.com/cilium/cilium (opens new window)
- https://github.com/cilium/hubble (opens new window)
- https://helm.sh/ (opens new window)

