November 4, 2025 - Patrick Kerwood
Setting up Workload Identity Federation between Keycloak and Google Cloud.
In this blog post, I’ll demonstrate how to set up a Workload Identity Federation between Keycloak and Google Cloud Platform, allowing a Keycloak client to impersonate a Google service account to create a Cloud Storage bucket.
Typically, when we talk about Workload Identity Federation, we’re referring to authentication methods that don’t rely on static credentials. In this example, however, we’ll use static credentials in the form of a Keycloak client credentials set.
Imagine an on-premises workload that needs access to your Google Cloud environment. If, for valid security or compliance reasons, your organization has disabled the option to create a static credentials file for service account impersonation, Workload Identity Federation becomes the only viable alternative.
In this post, I’ll demonstrate several ways to configure this setup, both with and without exposing Keycloak publicly.
# Creating the Workload Identity Pool
First, set your active Google Cloud project.
gcloud config set project <your-project-id>
Next, create the Workload Identity Pool. In this tutorial, we’ll name it keycloak.
gcloud iam workload-identity-pools create keycloak --location global
# Creating the Identity Pool Provider
Create a provider in the newly created identity pool.
For this tutorial, I’ve created a Keycloak realm called demo, which I’ll be using throughout the example. The provider will be named demo-realm.
This step is important because it’s where we configure the issuer URI, define attribute mappings and conditions, and add the JSON Web Keys if you’re using a Keycloak instance that is not publicly accessible.
I’ll go through each topic in detail, and the final gcloud command will be provided at the end of this section.
# Keycloak Issuer URL
You can find the issuer URI in Keycloak under Realm Settings, at the bottom of the page there's an OpenID Endpoint Configuration link.
Copy the URL from the issuer property and provide it as the value for the --issuer-uri argument.
# Attribute Mapping
This is where we define the attribute mapping (opens new window), which maps values from the Keycloak token to the Google token used for authorization.
The --attribute-mapping argument specifies how these values are translated. In the example below, we map two attributes.
google.subject=assertion.sub(Required)- The
google.subjectclaim must be unique for each client. Here, it maps to the Keycloak client’s unique UUID.
- The
attribute.client_id=assertion.client_id(Optional)- Maps the Keycloak client ID. Note that this value can be changed in Keycloak, so use it carefully.
You can, of course, add additional mappings as needed.
# Attribute Conditions
In addition to mapping attributes, you can also create attribute conditions (opens new window).
Attribute conditions are CEL expressions that can check assertion attributes and target attributes. If the attribute condition evaluates to true for a given credential, the credential is accepted. Otherwise, the credential is rejected.
For example, if you want only Keycloak clients with a client scope named google_federation set to true to be able to use this federation,
add the following parameter to the final gcloud provider create command, assuming you’ve created and assigned that scope to your client in Keycloak.
You can, of course, use any other claim you prefer.
--attribute-condition="assertion.google_federation==true"
# Federation with a Non-Public Keycloak
Setting up federation with an internal Keycloak instance that is not publicly accessible is absolutely possible. In this case, we need to provide the JSON Web Keys to Google manually. Normally, when another entity needs to verify a token, it retrieves the necessary information directly from Keycloak’s publicly available endpoint. If that endpoint isn’t accessible, we can supply the keys ourselves.
The main drawback is that whenever the keys are rotated in Keycloak, you must update them wherever they have been manually uploaded.
To obtain the keys, go to Realm Settings in Keycloak and click the OpenID Endpoint Configuration link at the bottom of the page.
Locate the jwks_uri property and copy the URL.
Then, run the following command, replacing the URL with the one you copied, to download the keys:
curl -o jwks.json https://auth.example.org/realms/demo/protocol/openid-connect/certs
To use the downloaded keys, simply add the following argument to the final gcloud provider create command.
--jwk-json-path="./jwks.json"
If this argument is supplied, Google will use the provided keys instead of retrieving them from Keycloak’s /.well-known/openid-configuration endpoint.
# The final gcloud provider create command
Below is the final command we’ll use in this tutorial. It does not include the --jwk-json-path or --attribute-condition arguments, but you can add them if needed.
gcloud iam workload-identity-pools providers create-oidc demo-realm \
    --location global \
    --workload-identity-pool keycloak \
    --issuer-uri "https://auth.example.org/realms/demo" \
    --attribute-mapping "google.subject=assertion.sub,attribute.client_id=assertion.client_id"
You can find more documentation about the above command here (opens new window).
# Creating the Keycloak Client
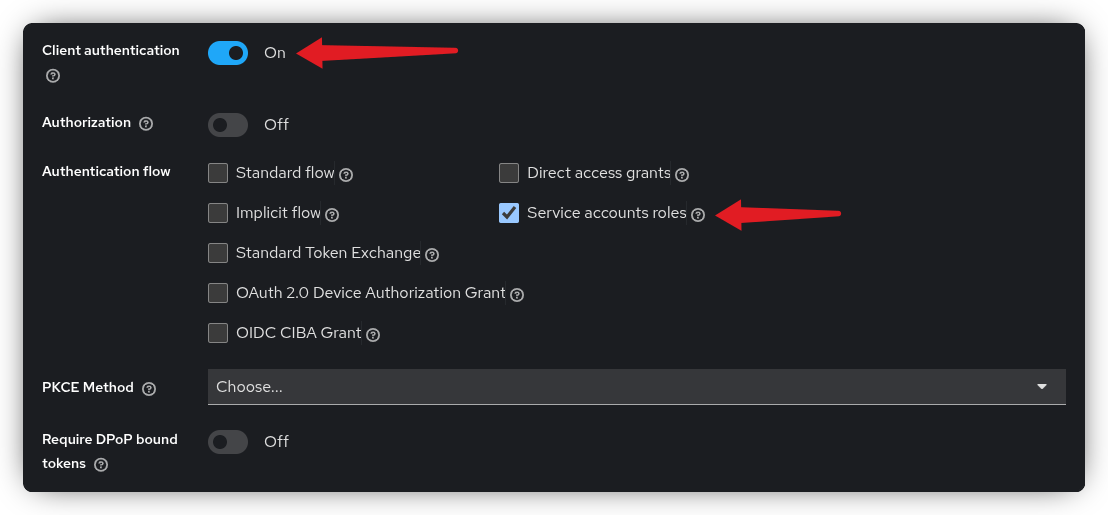
Go to your Keycloak instance and create a new client of type OpenID Connect.
In the Capability Config step, enable Client authentication and select Service accounts roles. None of the other authentication flows are required for this setup.
# Audience as Client Scope
Google requires the access token to include a specific audience, which we’ll define using a client scope. Before doing that, we need to obtain the audience string, this is the full URL of the pool provider.
Run the following command to generate the audience string, assuming you’ve used the same names as in this tutorial.
PROVIDER_NAME=$(gcloud iam workload-identity-pools providers describe demo-realm --location global --workload-identity-pool keycloak --format='get(name)')
echo "https://iam.googleapis.com/$PROVIDER_NAME"
# output: https://iam.googleapis.com/projects/<project-number>/locations/global/workloadIdentityPools/keycloak/providers/demo-realm
To create a client scope, navigate to Client Scopes in the left-hand menu and click Create client scope.
Name the scope gcp-identity-pool-demo-realm and save it.
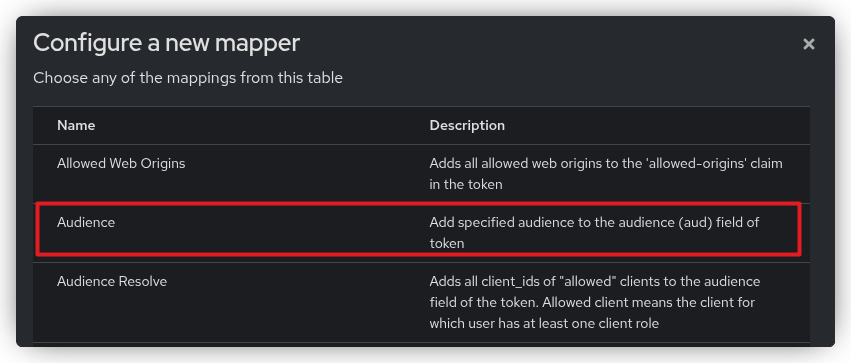
Next, open the Mappers tab of the newly created client scope, click Configure a new mapper, and select Audience.
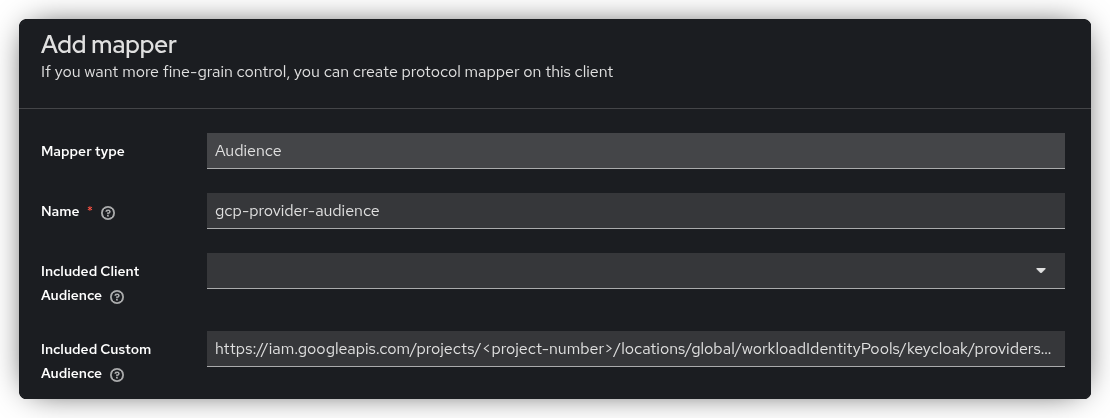
On the Add Mapper page, provide a name for the mapper and paste the audience string generated from the previous command into the Included Custom Audience field and save.
# Add the Scope to the Client
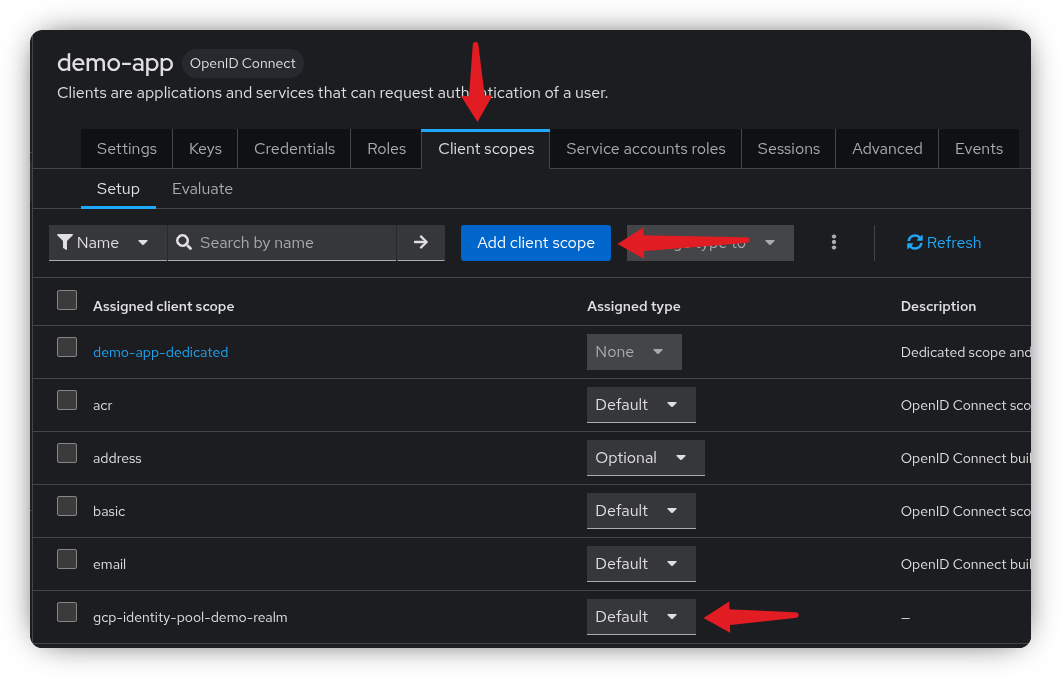
Any client that needs to use the Google Workload Identity Pool must include this client scope to ensure the correct audience is set.
Go to the client you created in the first step, open the Client Scopes tab, and click Add client scope. Search for the client scope you just created and add it as Default.
# Verify the Client
Let’s verify the token. Run the following command to request a token for the newly created client, replacing the URL, <client-id>, and <client-secret> with your own values.
The token_endpoint URL can once again be found under Realm Settings and OpenID Endpoint Configuration link.
curl --request POST \
  --silent \
  --url 'https://auth.example.org/realms/demo/protocol/openid-connect/token' \
  --header 'content-type: application/x-www-form-urlencoded' \
  --data grant_type=client_credentials \
  --data client_id=<client-id> \
  --data client_secret=<client-secret> \
  | jq -r .access_token \
  | awk -F. '{print $2}' \
  | base64 -d \
  | jq
The access token should now be displayed in your terminal. Verify that the aud claim includes your custom audience string.
Take note of the subject claim (sub), this is the unique UUID of the Keycloak client, which we will need in the upcoming steps.
# Creating the Google Service Account
Now we’re going to create a Google service account that allows the Keycloak client to impersonate it. Essentially, this gives the Keycloak client permission to exchange its own access token for a Google access token.
Create a service account named kc-service-a.
gcloud iam service-accounts create kc-service-a
Lets give it Storage Admin role so that it can create Cloud Storage buckets.
gcloud projects add-iam-policy-binding <project-id> \
    --member "serviceAccount:kc-service-a@<project-id>.iam.gserviceaccount.com" \
    --role "roles/storage.admin"
The role we’re assigning below is the workloadIdentityUser role.
This role allows external entities to impersonate the service account, in this case, the Keycloak client we created earlier.
Replace <client-subject-value> with the sub (subject claim) value you noted from the previous step.
POOL_NAME=$(gcloud iam workload-identity-pools describe keycloak --location global --format='get(name)')

gcloud iam service-accounts add-iam-policy-binding kc-service-a@<project-id>.iam.gserviceaccount.com \
  --role roles/iam.workloadIdentityUser \
  --member principal://iam.googleapis.com/$POOL_NAME/subject/<client-subject-value>
Note that in the command above, we are using principal as the member type.
If you want to use other optional mapped attributes, you will need to use principalSet instead, see example below.
You can learn more about principal types here. (opens new window)
POOL_NAME=$(gcloud iam workload-identity-pools describe keycloak --location global --format='get(name)')

gcloud iam service-accounts add-iam-policy-binding kc-service-a@<project-id>.iam.gserviceaccount.com \
  --role roles/iam.workloadIdentityUser \
  --member principalSet://iam.googleapis.com/$POOL_NAME/attribute.client_id/<client-id>
The final step is to enable the IAM Service Account Credentials API, which is required to impersonate the service account.
gcloud services enable iamcredentials.googleapis.com
You should now be able to impersonate the Google service account using your Keycloak client and create a storage bucket.
# Testing the whole setup
To test the setup, we’ll create a simple Go application that uses the Google Cloud SDK for Go to create a storage bucket.
The Google SDK looks for the GOOGLE_APPLICATION_CREDENTIALS environment variable, which specifies the path to a configuration file.
This file tells the SDK how to retrieve the Keycloak token and what to do with it.
For this demo, we’ll use an executable, a simple Bash script that retrieves the token. The SDK can also read access tokens directly from file, but this requires a separate mechanism to refresh the token as needed. This approach is commonly used in Kubernetes environments.
This script is simplified for demonstration purposes and should be improved for production use.You can read more about how the executable should behave here. (opens new window)
Create the Bash script below, call it get-kc-token.sh and replace the placeholder values with your own.
This script will request a token from Keycloak and output the necessary JSON object that the Google SDK can read.
Remember to make the script executable.
#!/bin/bash
TOKEN=$(curl --request POST \
  --silent \
  --url 'https://auth.example.org/realms/demo/protocol/openid-connect/token' \
  --header 'content-type: application/x-www-form-urlencoded' \
  --data grant_type=client_credentials \
  --data client_id=<client-id> \
  --data client_secret=<client-secret> \
  | jq -r '.access_token')

jq -n --arg token "$TOKEN" \
'{
  version: 1,
  success: true,
  token_type: "urn:ietf:params:oauth:token-type:jwt",
  id_token: $token
}'
Next, we need to create the credentials configuration file using the gcloud CLI.
This will generate a credential-config.json file, which the Google SDK will reference for authentication.
POOL_NAME=$(gcloud iam workload-identity-pools describe keycloak --location global --format='get(name)')

gcloud iam workload-identity-pools create-cred-config \
    $POOL_NAME/providers/demo-realm \
    --service-account="kc-service-a@<project-id>.iam.gserviceaccount.com" \
    --executable-command="./get-kc-token.sh" \
    --output-file="credential-config.json"
Before we look at the Go application, set the following two environment variables.
The first variable points to the newly created credentials-config.json file, and the second allows the Google SDK to
run executables.
export GOOGLE_APPLICATION_CREDENTIALS="$(pwd)/credential-config.json"
export GOOGLE_EXTERNAL_ACCOUNT_ALLOW_EXECUTABLES=1
Below is the simple Go application that creates a Cloud Storage bucket.
When the storage.NewClient() function executes, it will:
- Look for the
GOOGLE_APPLICATION_CREDENTIALSenvironment variable. - Read the credentials configuration file located at that path.
- Execute the
get-kc-token.shscript to obtain a Keycloak access token. - Exchange the Keycloak token for a Google access token.
- Impersonate the configured service account to create the storage bucket.
Create a new Go project.
go mod init gcp
Create a main.go file, add below code to it and set the googleProjectID variable to your Google project ID.
package main

import (
	"context"
	"crypto/rand"
	"encoding/hex"
	"log"

	"cloud.google.com/go/storage"
)

func main() {
	googleProjectID := "<google-project-id>"
	ctx := context.Background()

  // This is where the authentication happens.
	client, err := storage.NewClient(ctx)

	if err != nil {
		log.Fatalf("Failed to create client: %v", err)
	}

	// ---[ Bucket Name ]--------------------------------------
	bytes := make([]byte, 3)
	rand.Read(bytes)
	bucketName := "bucket-" + hex.EncodeToString(bytes)
	// --------------------------------------------------------

	if err := client.Bucket(bucketName).Create(ctx, googleProjectID, nil); err != nil {
		log.Fatalf("Failed to create bucket: %v", err)
	}

	log.Printf("Successfully created bucket [%s]", bucketName)
}
Install the dependencies and run the code.
$ go mod tidy
$ go run main.go
2025/11/04 21:12:37 Successfully created bucket [bucket-8f1d67]
# References
- Google Docs: Configure Workload Identity Federation with other identity providers (opens new window)
- Google Docs: Attribute Mapping (opens new window)
- Google Docs: Attribute Conditions (opens new window)
- Google Docs: Principal Types (opens new window)
- Google Docs: Create a credential configuration (opens new window)

