September 24, 2025 - Patrick Kerwood
Setting Up Keycloak with Docker Compose
In this post, I’ll guide you through installing Keycloak with Docker Compose, with or without an SQL backend, and configuring it using my default Traefik setup. We’ll set up a dedicated URL for a realm and add a redirect from the realm’s root URL to its admin console.
# Keycloak Configuration
This post includes two different Docker Compose configurations, but the explanations below apply equally to both.
- Bootstrap Admin Credentials
UseKC_BOOTSTRAP_ADMIN_USERNAMEandKC_BOOTSTRAP_ADMIN_PASSWORDfor your initial login. Once the instance is running, log in to Keycloak, create your own admin user account, and then comment out these two variables. - HTTP Listener
Since Traefik is handling TLS in front of Keycloak, you must explicitly enable the HTTP listener by settingKC_HTTP_ENABLED=true. - Proxy Headers
Allow Keycloak to accept theX-Forwarded-*headers injected by Traefik by enabling proxy support by settingKC_PROXY_HEADERS=xforwarded. - Hostname
Define the hostname Keycloak should use withKC_HOSTNAME.
The container labels in the Docker Compose file come from my standard Traefik configuration (opens new window) and are designed to work with the traefik-proxy Docker network created by that setup.
# Without SQL
The following Docker Compose example sets up Keycloak without a SQL backend. The environment variable KC_DB=dev-file tells Keycloak to use a file-based database for storing its data.
This approach works well for development or a home lab setup, I personally use it in my home lab. To ensure data persists across container restarts, a dedicated volume is mounted for Keycloak’s data storage.
Update the password for temp-user and replace the Host URL with your own.
networks:
  traefik-proxy:
    external: true

volumes:
  keycloak_data:

services:
  keycloak:
    image: quay.io/keycloak/keycloak:26.3
    container_name: keycloak
    restart: unless-stopped
    expose:
      - 8080
    environment:
      KC_BOOTSTRAP_ADMIN_USERNAME: temp-user
      KC_BOOTSTRAP_ADMIN_PASSWORD: <some-random-password>
      KC_DB: dev-file
      KC_HTTP_ENABLED: true
      KC_PROXY_HEADERS: xforwarded
      KC_HOSTNAME: auth.example.org
    volumes:
        - keycloak_data:/opt/keycloak/data
    command:
        - start
    networks:
      - traefik-proxy
    labels:
      - traefik.enable=true
      - traefik.http.services.keycloak.loadbalancer.server.port=8080
      - traefik.http.routers.keycloak.rule=Host(`auth.example.org`)
      - traefik.http.routers.keycloak.tls.certresolver=le
      - traefik.http.routers.keycloak.entrypoints=websecure
# With SQL
In the Docker Compose file below, a Postgres database is deployed and used as the backend for Keycloak.
To isolate Postgres from other applications on the traefik-proxy network, a dedicated keycloak-sql network is created for the Postgres instance. Keycloak is attached to both networks, allowing it to communicate with Postgres while remaining accessible to Traefik.
Be sure to:
- Change the password for
temp-user. - Set a secure password for the Keycloak Postgres user.
- Update the URL to match your own environment.
networks:
  keycloak-sql:
  traefik-proxy:
    external: true

volumes:
  postgres-data:

services:
  keycloak:
    image: quay.io/keycloak/keycloak:26.3
    container_name: keycloak
    restart: unless-stopped
    expose:
      - 8080
    environment:
      KC_BOOTSTRAP_ADMIN_USERNAME: temp-user
      KC_BOOTSTRAP_ADMIN_PASSWORD: <some-random-password>
      KC_HTTP_ENABLED: true
      KC_PROXY_HEADERS: xforwarded
      KC_HOSTNAME: auth.example.org
      KC_DB: postgres
      KC_DB_URL: jdbc:postgresql://postgres:5432/keycloak
      KC_DB_USERNAME: keycloak
      KC_DB_PASSWORD: <keycloak-pass>
    command:
        - start
    networks:
      - traefik-proxy
      - keycloak-sql
    labels:
      - traefik.enable=true
      - traefik.http.services.keycloak.loadbalancer.server.port=8080
      - traefik.http.routers.keycloak.rule=Host(`auth.example.org`)
      - traefik.http.routers.keycloak.tls.certresolver=le
      - traefik.http.routers.keycloak.entrypoints=websecure
      - traefik.docker.network=traefik-proxy
  postgres:
    container_name: keycloak-postgres
    image: postgres:17
    restart: unless-stopped
    environment:
      POSTGRES_DB: keycloak
      POSTGRES_USER: keycloak
      POSTGRES_PASSWORD: <keycloak-pass>
    volumes:
      - postgres-data:/var/lib/postgresql/data
    networks:
      - keycloak-sql
# Dedicated Realm URL
Remembering the full path to the Keycloak realm admin console can be inconvenient, and sometimes you may prefer to use a custom hostname for a realm. Fortunately, Keycloak supports configuring hostnames per realm. With a bit of extra Traefik setup, you can even redirect users from the root URL directly to the admin console of specific realm.
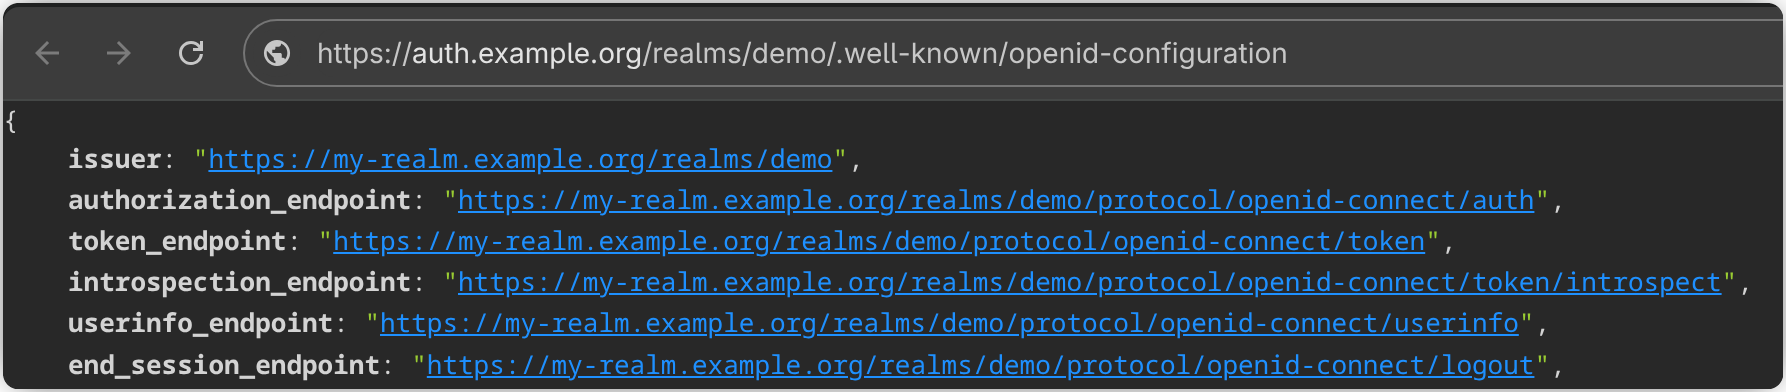
Go to Realm settings for your realm and set the Frontend URL to your desired address, for example https://my-realm.example.org.
This updates the base URL for all endpoints associated with the realm.
Next, to allow Keycloak to accept multiple hostnames, you need to remove the KC_HOSTNAME environment variable and instead set KC_HOSTNAME_STRICT=false in the Dockerfile.
According to the official documentation (opens new window),
it’s generally recommended to explicitly set KC_HOSTNAME for security reasons. However, when running behind a reverse proxy and
configuring KC_PROXY_HEADERS correctly, using a flexible hostname setup is considered safe.
This configuration is enough to set up a Keycloak realm with a dedicated URL.
However, you’ll still need to enter the full path (/admin/my-realm/console) to access the admin console.
To simplify this, you can add a redirect using extra Traefik labels.
You’ll need to configure a route for the realm (my-realm) that uses the specified realm URL but still points to the keycloak service.
This route references a middleware called realm-redirect, which will redirect all traffic from:
https://my-realm.example.org to https://my-realm.example.org/admin/my-realm/console.
Be sure to replace my-realm.example.org with your own realm URL.
networks:
  traefik-proxy:
    external: true

volumes:
  keycloak_data:

services:
  keycloak:
    image: quay.io/keycloak/keycloak:26.3
    container_name: keycloak
    restart: unless-stopped
    expose:
      - 8080
    environment:
      KC_BOOTSTRAP_ADMIN_USERNAME: temp-user
      KC_BOOTSTRAP_ADMIN_PASSWORD: <some-random-password>
      KC_DB: dev-file
      KC_HTTP_ENABLED: true
      KC_PROXY_HEADERS: xforwarded
      KC_HOSTNAME_STRICT: false
    volumes:
        - keycloak_data:/opt/keycloak/data
    command:
        - start
    networks:
      - traefik-proxy
    labels:
      - traefik.enable=true
      - traefik.http.services.keycloak.loadbalancer.server.port=8080

      # Master realm
      - traefik.http.routers.keycloak.rule=Host(`auth.example.org`)
      - traefik.http.routers.keycloak.tls.certresolver=le
      - traefik.http.routers.keycloak.entrypoints=websecure
      - traefik.http.routers.keycloak.service=keycloak

      # My realm
      - traefik.http.routers.my-realm.rule=Host(`my-realm.example.org`)
      - traefik.http.routers.my-realm.tls.certresolver=le
      - traefik.http.routers.my-realm.entrypoints=websecure
      - traefik.http.routers.my-realm.service=keycloak
      - traefik.http.routers.my-realm.middlewares=realm-redirect

      # Middleware: redirect root "/" to /admin/demo/console
      - traefik.http.middlewares.realm-redirect.redirectregex.regex=^https://my-realm.example.org/$
      - traefik.http.middlewares.realm-redirect.redirectregex.replacement=https://my-realm.example.org/admin/my-realm/console
      - traefik.http.middlewares.realm-redirect.redirectregex.permanent=true
I usually prefer configuring Traefik with labels since it keeps the configuration close to the application. This approach simplifies the setup and makes it easier to reproduce. However, if you’re running multiple realms, the Docker Compose file can quickly become cluttered with container labels. In that case, it might be worth considering a dedicated Traefik configuration file instead.
# References
- Keycloak: Configuring the hostname (v2) (opens new window)
- Keycloak: All configuration (opens new window)

