April 10, 2021 - Patrick Kerwood
Pinniped, Kubernetes Single Sign-on with OpenID Connect
In this tutorial I will setup Pinniped, a Single Sign-on solution from the VMware Tanzu project. Pinniped gives you a unified login experience across all your clusters, including on-premises and managed cloud environments.
Pinniped consists of two components, Supervisor and Concierge.
From the architecture docs: (opens new window)
The Pinniped Supervisor is an OIDC server which allows users to authenticate with an external identity provider (IDP), and then issues its own federation ID tokens to be passed on to clusters based on the user information from the IDP.
The Pinniped Concierge is a credential exchange API which takes as input a credential from an identity source (e.g., Pinniped Supervisor, proprietary IDP), authenticates the user via that credential, and returns another credential which is understood by the host Kubernetes cluster or by an impersonation proxy which acts on behalf of the user.

# Prerequisites
For this tutorial you will need the following.
- A working Kubernetes cluster with:
- An ingress controller installed.
- Cert Manager installed or a trusted certificate.
- An OIDC Provider.
- A domain name for Supervisor. In this tutorial I will be using
supervisor.example.org. Point the domain name to your ingress controller IP.
# Identity provider details
I will be using Azure as my identity provider.
Which ever provider you choose, you should end up with a client ID and secret which has to be applied to a kubernetes secret later.
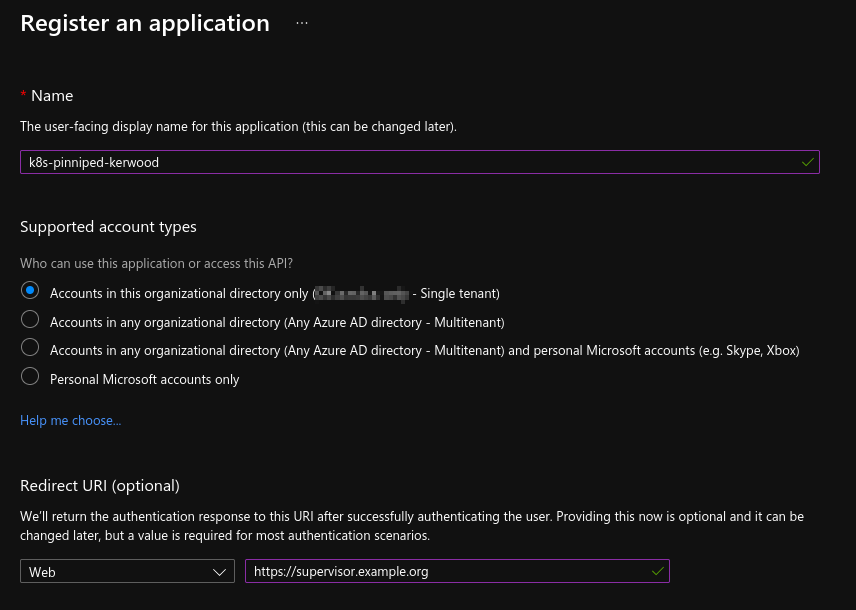
When creating your client you will need to add a callback URL. Use https://<your-supervisor-domain>/callback, eg. https://supervisor.example.org/callback.
In Azure, just create a simple App Registration with the callback URL, as shown in the image below, and create a new secret in the Certificates & secrets menu.
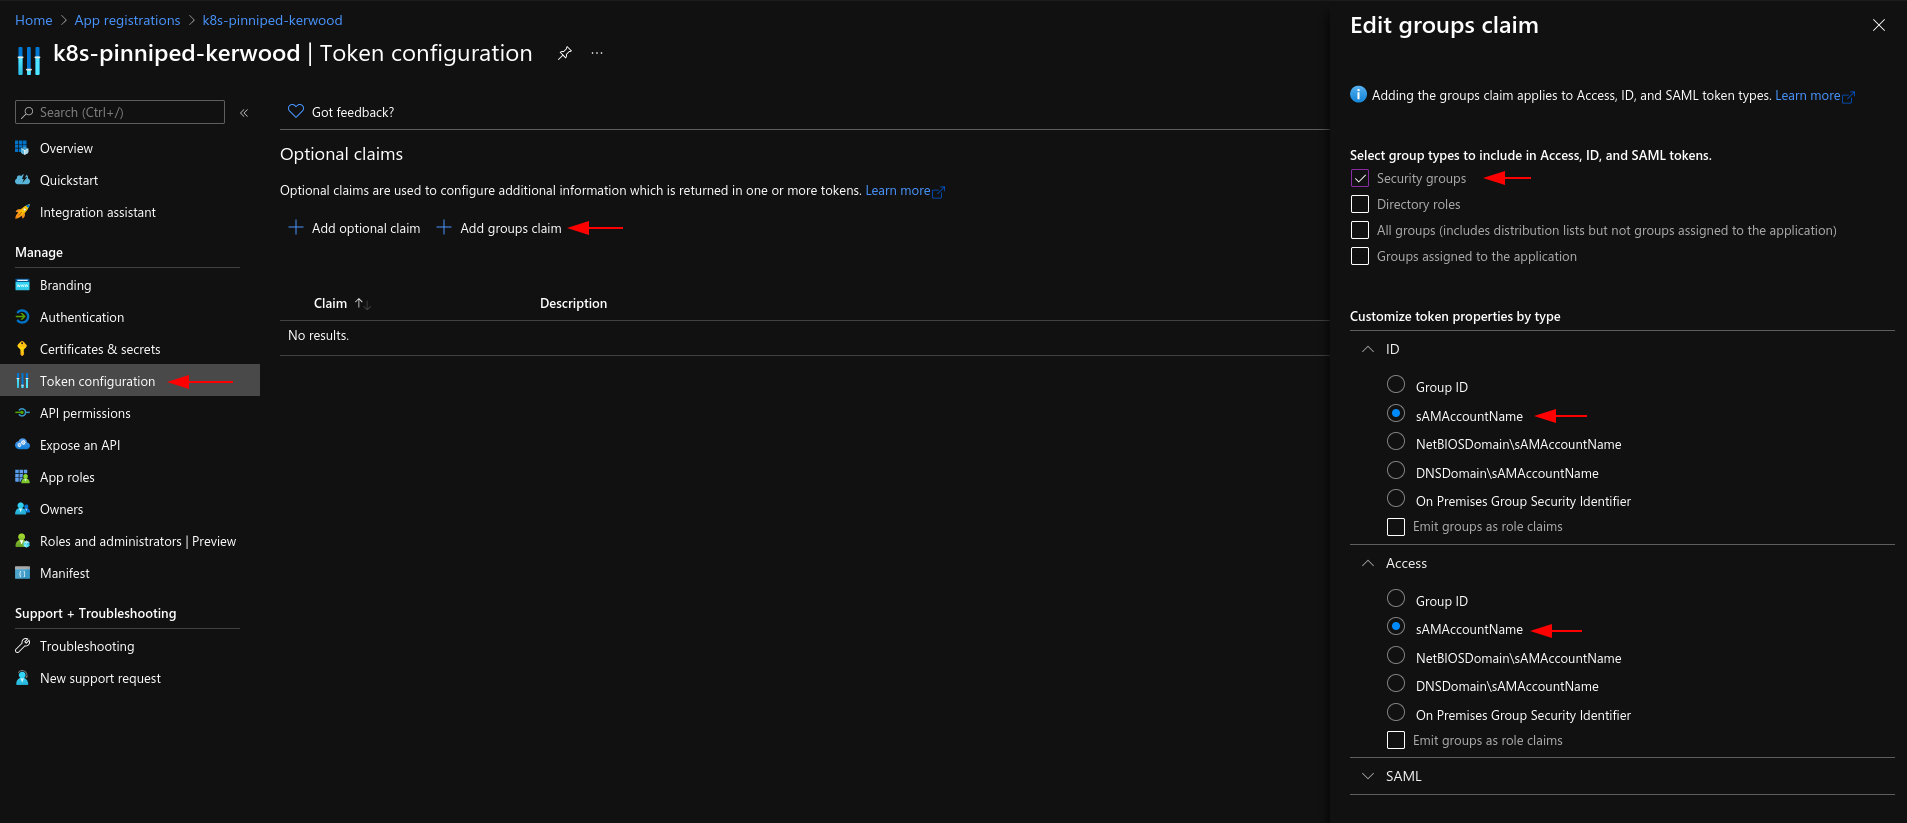
Because I want to create Kubernetes role bindings based on Azure groups, I have added a groups claim to the App Registration as shown in below screenshot. Besides adding the group claim and creating the secret, I haven't done anything else.
# Installing Supervisor
Run below command to install Supervisor, this will install everything to the pinniped-supervisor namespace. Personally I like to install a specific version, but you can change v0.7.0 to latest if you want.
kubectl apply -f https://get.pinniped.dev/v0.7.0/install-pinniped-supervisor.yaml
After installing Pinniped, create a secret with the client ID and secret from your identity provider. In below command I have named the secret azure-oidc-client.
kubectl create secret generic azure-oidc-client \
  --namespace pinniped-supervisor \
  --type secrets.pinniped.dev/oidc-client \
  --from-literal=clientID="<client-id-goes-here>" \
  --from-literal=clientSecret="<secret-goes-here>"
Since Supervisor needs to be reachable from other clusters, we need to create a service and an ingress resource. Change the ingress manifest to fit your needs. Your endpoint needs to have a trusted TLS certificate or your identity provider will not make the callback. In my example I use Cert Manager.
apiVersion: v1
kind: Service
metadata:
  namespace: pinniped-supervisor
  name: pinniped-supervisor
spec:
  selector:
    app: pinniped-supervisor
  ports:
    - port: 80
      targetPort: 8080
      protocol: TCP
---
apiVersion: networking.k8s.io/v1
kind: Ingress
metadata:
  name: pinniped-supervisor
  namespace: pinniped-supervisor
  annotations:
    kubernetes.io/ingress.class: nginx
    cert-manager.io/cluster-issuer: le-http01
spec:
  tls:
  - hosts:
    - supervisor.example.org
    secretName: supervisor-cert
  rules:
  - host: supervisor.example.org
    http:
      paths:
      - path: /
        pathType: Prefix
        backend:
          service:
            name: pinniped-supervisor
            port:
              number: 80
Create and apply a FederationDomain resource. Give it a name and set the issuer to the URL you will be using for Supervisor.
apiVersion: config.supervisor.pinniped.dev/v1alpha1
kind: FederationDomain
metadata:
  name: azure-example-org
  namespace: pinniped-supervisor
spec:
  issuer: https://supervisor.example.org
Create and apply a OIDCIdentityProvider resource.
- Give it a name
- Set the
issuerproperty - Set the
secretName.
apiVersion: idp.supervisor.pinniped.dev/v1alpha1
kind: OIDCIdentityProvider
metadata:
  name: azure-idp
  namespace: pinniped-supervisor
spec:
  issuer: https://login.microsoftonline.com/<tenant-id>/v2.0
  claims:
    username: email
    groups: groups
  authorizationConfig:
    additionalScopes: ['email', 'profile']
  client:
    secretName: azure-oidc-client
That is it for the Supervisor.
# Installing Concierge
Install Concierge on any managed or unmanaged cluster you would like to use OIDC login on. This can include the cluster where Supervisor is running.
Again, you can install a specific version or the latest, just make sure the version number matches the Supervisor install.
kubectl apply -f https://get.pinniped.dev/v0.7.0/install-pinniped-concierge.yaml
Create and apply a JWTAuthenticator resource, it is cluster scoped so no need for namespaces. Create a random string for the audience property using openssl rand -base64 24.
apiVersion: authentication.concierge.pinniped.dev/v1alpha1
kind: JWTAuthenticator
metadata:
   name: supervisor-jwt-authenticator
spec:
   issuer: https://supervisor.example.org
   audience: <random-string>
   claims:
     username: username
     groups: groups
# Example Role Binding
Below is an example of a ClusterRoleBinding that binds the role cluster-admin to the Azure group my-azure-group-name. Create your own role bindings to fit your needs and apply them to the cluster.
apiVersion: rbac.authorization.k8s.io/v1
kind: ClusterRoleBinding
metadata:
  name: cluster-admin-it-afdeling
roleRef:
  apiGroup: rbac.authorization.k8s.io
  kind: ClusterRole
  name: cluster-admin
subjects:
  - apiGroup: rbac.authorization.k8s.io
    kind: Group
    name: my-azure-group-name
That is it for Concierge.
# Generating the kubeconfig file
Download the Pinniped CLI from the Github release page (opens new window) an put it in a folder in your $PATH.
Grab the kubeconfig file for your cluster and generate a new one with the Pinniped CLI.
pinniped get kubeconfig > pinniped-kubeconfig
Test the new kubeconfig file. A new tab should appear in your browser were you are asked to login.
kubectl --kubeconfig pinniped-kubeconfig get pods -n pinniped-concierge
# Pinniped kubeconfig example
Below is an example of a kubeconfig generated by the Pinniped CLI.
apiVersion: v1
clusters:
- cluster:
    certificate-authority-data: LS0tLS1CRUdJTiBDRVJUSUZ0tLS0tCk1JS...
    server: https://<cluster-ip>:6443
  name: pinniped
contexts:
- context:
    cluster: pinniped
    user: pinniped
  name: pinniped
current-context: pinniped
kind: Config
preferences: {}
users:
- name: pinniped
  user:
    exec:
      apiVersion: client.authentication.k8s.io/v1beta1
      args:
      - login
      - oidc
      - --enable-concierge
      - --concierge-api-group-suffix=pinniped.dev
      - --concierge-authenticator-name=supervisor-jwt-authenticator
      - --concierge-authenticator-type=jwt
      - --concierge-endpoint=https://<cluster-ip>:6443
      - --concierge-ca-bundle-data=LS0tLS1CRUdJTiBDRVJUSUZJQ0FURS....
      - --issuer=https://supervisor.example.org
      - --client-id=pinniped-cli
      - --scopes=offline_access,openid,pinniped:request-audience
      - --request-audience=MtbVXXz9xdTvRk8BHN4ayq8wUzStOBZd
      command: /usr/local/bin/pinniped
      env: []
      provideClusterInfo: true

